On first glance, the Clerking Console can be intimidating. There are a lot of buttons and controls, and panels and sub-menus, but remember the first rule of Clerking:

This guide covers the Basics of Clerking a Webcast Auction, the absolute bare essentials of opening and operating the clerking controls.
Accessing the Webcast Console
Getting to the Webcast Clerking Console is quick and easy, only takes 3 clicks.
Navigation Path: Auctions & Items > View Auctions > shortcuts > Webcast button
Each Webcast Auction houses its own dedicated Webcast Clerking Console, to get to it, navigate to the Auctions & Items > View Auctions menu, inside the Auctions table, click on theshortcut and click the Webcast option.
Or, if you’ve just logged into the Webtron Dashboard, on the Dashboard Home page click on the Title of your Webcast Auction to open the Auction Details menu, then click the green Webcast Console shortcut at the top-right of your screen:
I opened the Clerking Console for the wrong Auction, how do I get out?
There’s a couple of ways you can return to the Webtron Dashboard.
The easiest is just hitting Back on your browser, mouse or trackpad (then click Leave/Leave Site when asked by your Browser):
Leave Site Warning
The Leave Site warning will prevent you from exiting the Clerking Console by accident (either by pressing back on your browser, or trying to close the Clerking Console tab or window). Just hit Cancel on that panel and the Clerking Console will remain open.
Or open the Auction Controls & Stream Settings tab at the top-right of the Clerking Console, then click the Open Admin button:
This will open the Auction Details menu in a new tab and keep the Clerking Console open in your original tab, if you need to return to it.
Clerking Controls – Starting your Webcast Auction early
When you first open your Clerking Console, it will look like this:
As a quick reminder, Webcast Auctions are divided into two phases:
- Pre-Bidding phase
- Live Bidding phase
Your role as the Clerk kicks in during the Live Bidding phase and the Clerking Controls also do not work until the Live Bidding phase is reached.
Your Webcast Auction will automatically roll from the Pre-Bidding phase to the Live Bidding phase once it reaches it’s set Start Time, but if the Auctioneer wants you to kick the Live Bidding phase off early, you can do so by opening the Auction Controls & Stream Settings tab at the top-right of your screen:
Then click the green Start Auction button:
I hit Start Auction by mistake, how do I fix it?
Don’t panic, your Webcast Auction can be rolled back to the Pre-Bidding phase by resetting it’s Start Date and Time. Note the Date and Time listed at the top of the Auction Controls & Stream Settings tab, then click the Open Admin button:
This will open the Auction Details menu in a new tab, at the top-right of your screen (beneath the Auction Title) click Edit Auction. Then open the Dates tab and restore the original Start Date and Time, then click Save Auction at the bottom-right of your screen:
Open the Clerking Console tab and give it a quick Refresh (: CTRL and R, : Command and R) and the Auction Controls will now say “Pre-bidding phase!” again.
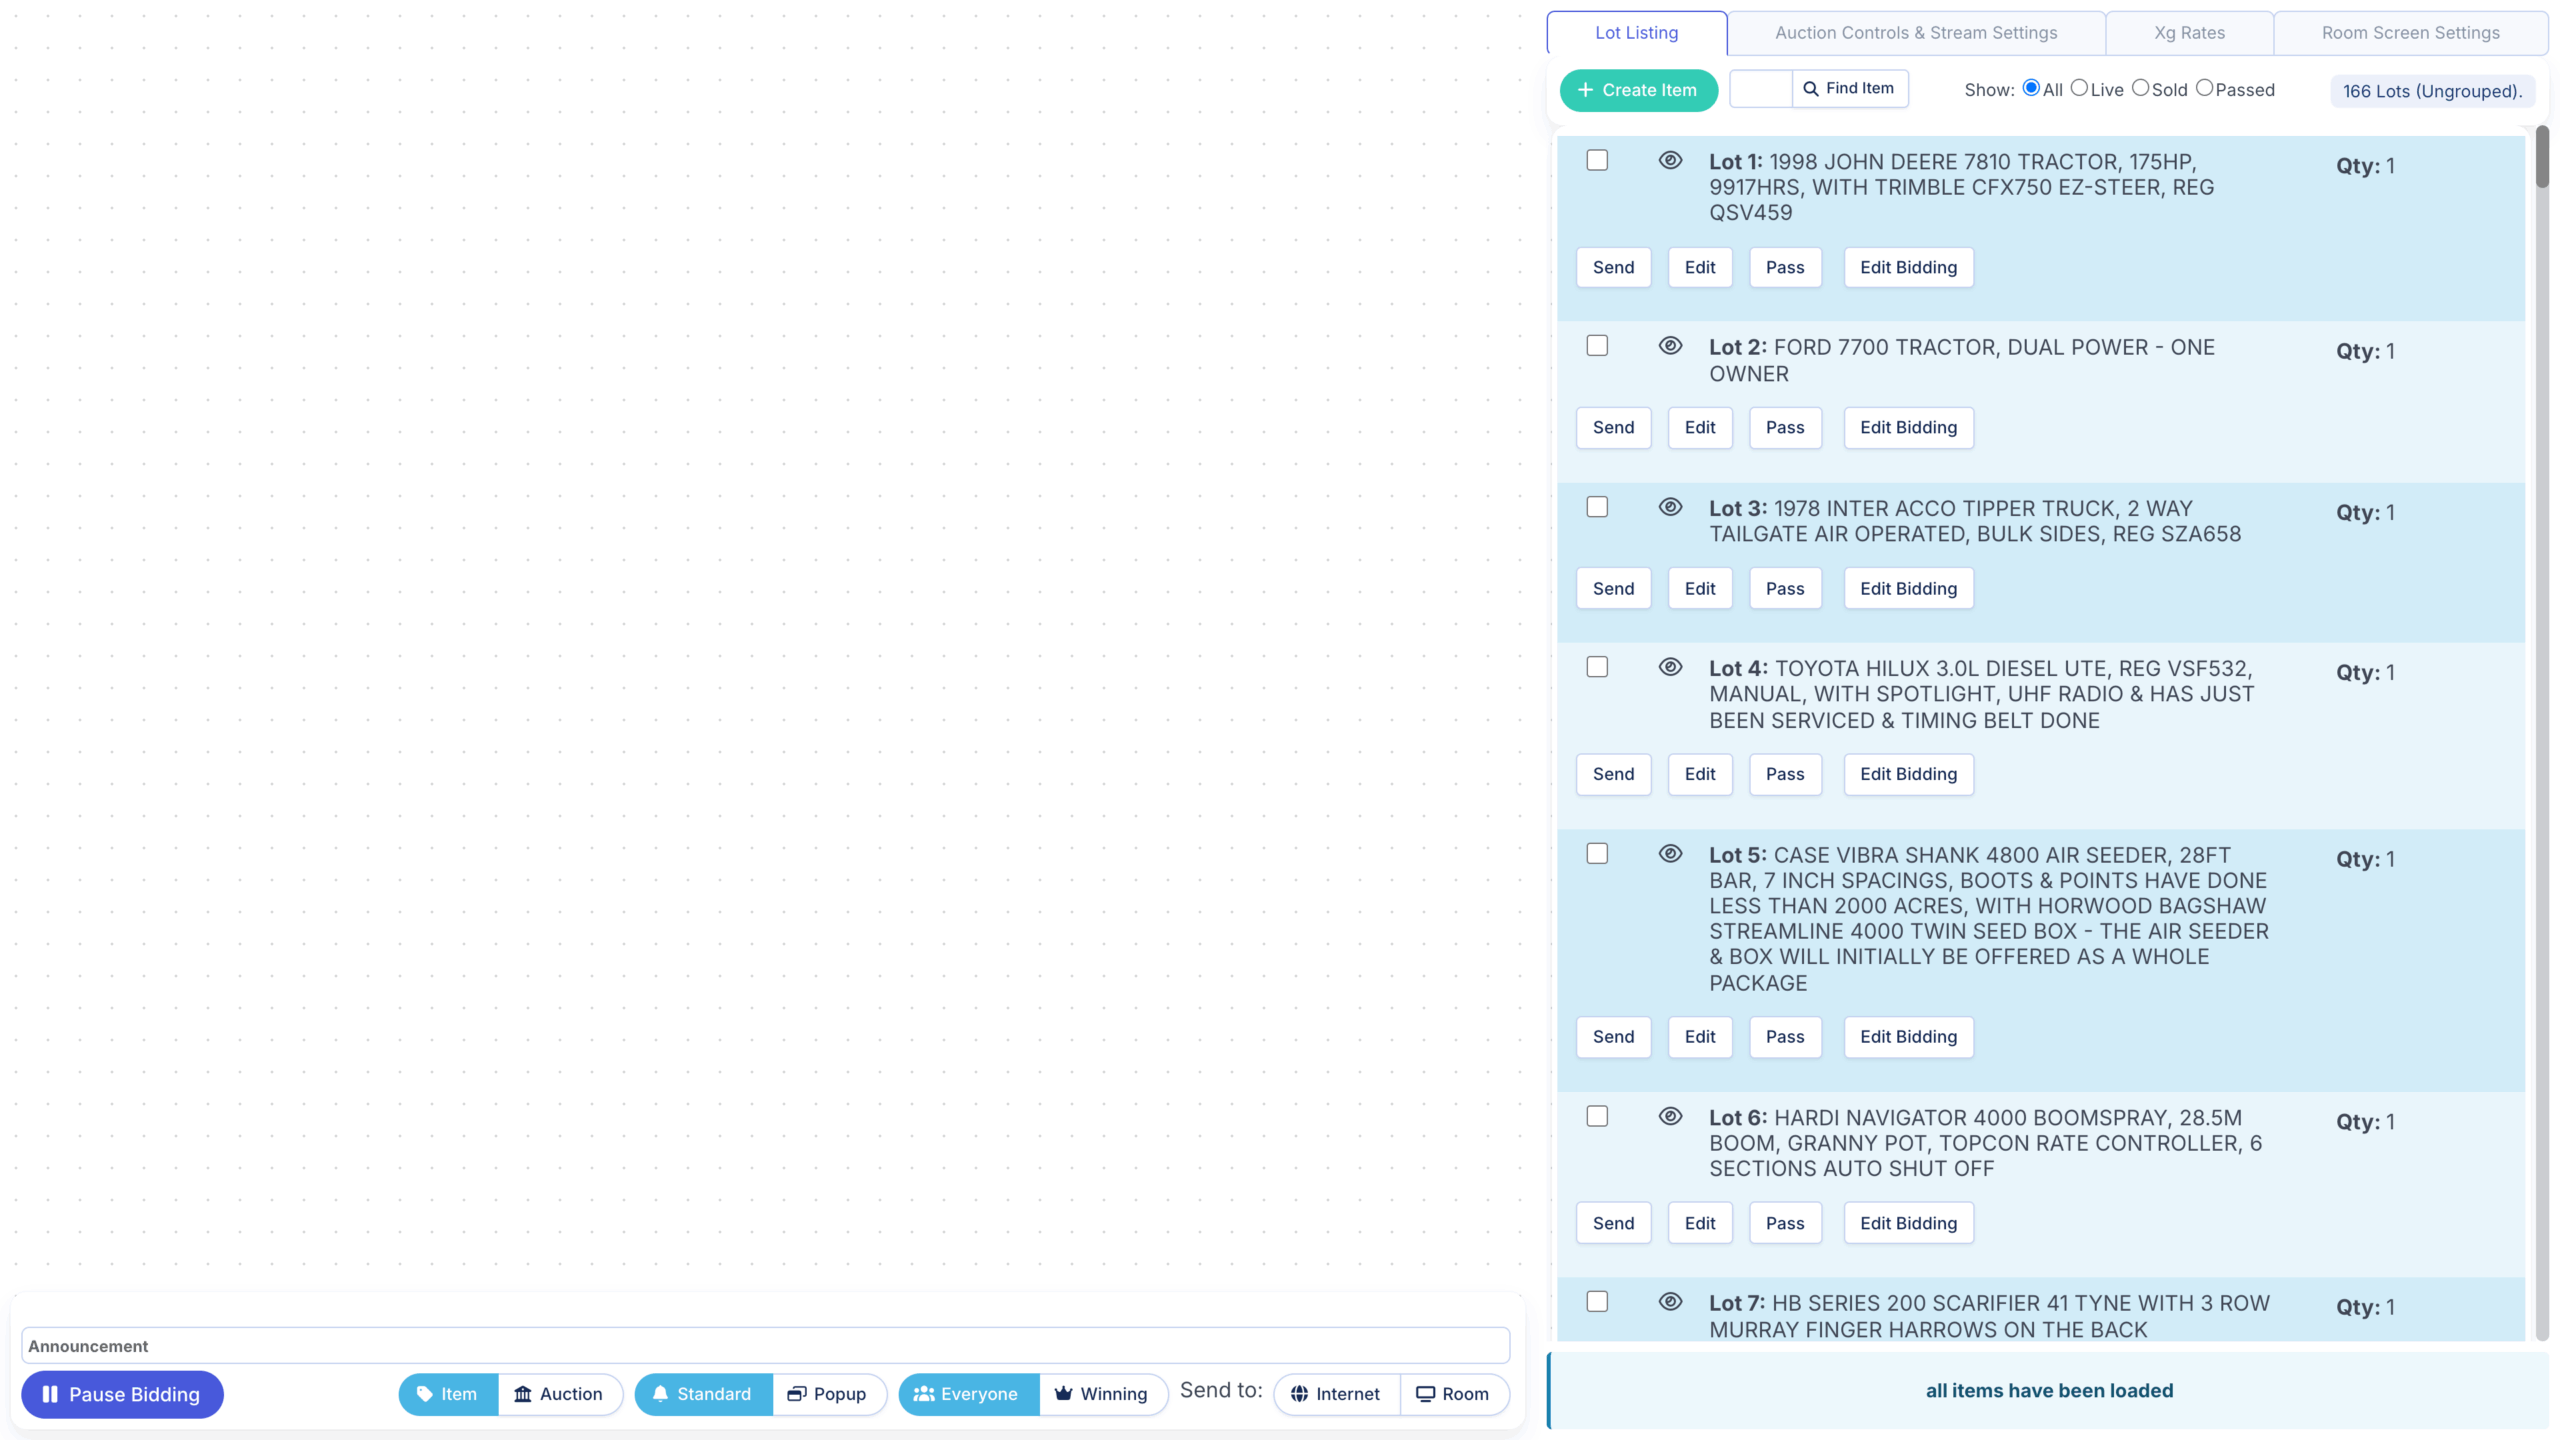
Clerk Controls – Sending your First Lot into the Ring
Once your Auction is in the Live Bidding phase and the Auctioneer has given you the nod, you can send your first Lot into the Ring by opening the Lot Listing tab, then click the Send button on any Lot (most Auctioneers will start on Lot 1 but you can send any Lot into the Ring):
This will enable the Ring Controls for that Lot and open it for bidding on your Portal.
I’m trying to set up a Lot but people keep bidding too early, what do I do?
If you need to tweak your Asking Price or wait for the Auctioneer’s go-ahead and you need to prevent pesky bidders from bidding too early, click the Pause Bidding button at the bottom-left (or press P on your keyboard):
This will lock out the Bid button on your Portal, just don’t forget to press Resume Bidding (or press P on your keyboard) to unlock the Bid button.
I’m clicking Send but the clerking console is saying “Unable to complete request – please report this error”
This error message will appear if you try to click Send before your Webcast Auction has rolled into the Live Bidding phase:
Clerking Controls – Pulling a Lot from the Ring (and re-opening Passed or Sold Lots)
If you’ve hit Send on the wrong Lot or need to temporarily pull it from the Ring, click the Remove From Bidding button
This will show the Send button on all of your Live lots, or you can click Re-Offer on any Passed or Sold lots to return them to the ring:
Clerking Controls – Setting your Asking Price
The 3 actions you’ll be performing as the Clerk more than any others are:
- Changing the Increment
- Placing bids on behalf of the Floor and Commission Bids
- Changing the Asking Price
As a quick explainer, bidding consists of 3 core figures:
- The Hammer Price – the Current Highest Bid you have
- The Asking Price – the Hammer + the Increment (or what is currently showing on the Bid button on your Portal, i.e. the next acceptable bid)
- The Increment – the amount the Asking Price and Hammer will rise by with each bid received
Once a Lot is sent to the Ring, the Auctioneer may ask you to set an asking price that they want to start the bidding at, to do this hold Shift and press the A key on your keyboard to select and clear the Asking Price field:
Then type out a whole amount (no currency symbols or commas, commas will be added for you), then press Enter/Return on your keyboard to set that amount as the Asking Price:
Clerking Controls – Changing the Increment
If the Auctioneer asks you to drop or raise the Increment, you can do so by selecting the amount they have requested under the Increments column. Left-click once to select the Increment:
The Increment the Auctioneer wants isn’t on the list, what do I do?
At the bottom of the Increments list you’ll find the Add Increment field:
Simply click on it, type out the whole amount you’d like to add, then hit Enter/Return on your keyboard to add it to the list:
Your newly added Increment will be auto-selected for you.
I’m clicking on an Increment but it isn’t changing, what do I do?
If your Webcast Auction was using Auto Increments for the Pre-Bidding phase, look towards the bottom of the Increment list, here you’ll find the Manual Incr. checkbox:
Tick Manual Incr. to enable Manual Increment control, then click on the Increment you need to switch to again:
Clerking Controls – Placing a Floor Bid and Converting Online Bids to Floor Bids
As a Clerk, it’s your responsibility to place Floor Bids on behalf of bidders who are either bidding in-person, over the phone, or have left absentee bids. To place a Floor Bid at the current Asking Price, click the green Bid # button or press the B key on your keyboard:
If an Online Bid is received at the same time as a Floor Bid, and the Auctioneer has chosen to favour the Floor Bid, click Convert to Floor Bid button or press the F key on your keyboard to convert the current highest online bid to a Floor Bid:
Clerking Controls – Accepting a Commission Bid
During the Pre-Bidding and Live Bidding phases, your bidders can set an amount they are willing to bid up to.
During the Pre-Bidding phase this is called an Auto Bid max, and during the Bidding Phase we refer to it as a Commission Bid max.
These bids appear in a special orange section of Bid History, and if Outbid, a green Commission Bid bar will enable above the regular Ring Controls:
Your responsibility as the Clerk is to bid on behalf of these bidders by accepting their Commission Bid. Any time the green Commission Bid bar lights up, left-click it as quickly as possible to accept that Commission Bid at the current Asking Price:
If a Commission Bid max is completely defeated, both the Commission Bid History section and bar will disappear from the Clerking Console:
Commission Bid Ordering
If you have received multiple Commission Bids on the same Lot, the green Commission Bid bar will order the acceptable Commission Bids by time placed, favouring the highest and first Commission Bid set on that Lot.
You may also encounter a situation where a Commission Bid is outbid at the same amount as their Commission Bid max. Commission Bids cannot be accepted if that Bidder is also the Current Highest Bidder.
Clerking Controls – Setting a Hammer Amount
If the bidding outpaces your clerking and the Auctioneer is calling a Current Bid that is higher than your Asking Price, we have a couple of methods for catching up:
- Press the B key on your keyboard – If the Auctioneer is calling an amount that is still following the same Increment you’re in, simply press the B key on your keyboard as many times as you need to
- Use the Hammer field – Alternatively you can hold Shift and press the H key on your keyboard, this will highlight and clear the Hammer field. Type in the amount you need to jump to (Whole number, no currency symbol and commas are auto-inserted for you) then press Enter/Return on your keyboard. This will set that amount as the current Hammer/Current Highest Bid.
Clerking Controls – Cancelling and Undoing Bids
If the Auctioneer requests it or you have placed an extra bid by mistake, click the Undo Bid button or press the U key on your keyboard:
This will cancel the Current Highest Bid and can be repeated if you need to cancel multiple bids in a row.
Alternatively you can click the Cancel Bid button inside the Bid History to cancel that specific bid.
I cancelled a bid by mistake, how do I fix it?
Don’t panic, in the Bid History section of the Clerking Console, click the Reinstate button on the bid you need to restore:
However, be cautious about this, if that bid was outbid at any point, clicking Reinstate will cancel any bids of a higher amount and restore that bid as the Current Highest Bid. Communicate with your Auctioneer if you’re not sure how to proceed.
Cancelled Bids Warning
Cancelled Bids can only be Reinstated by the Clerk and for Webcast Auctions only. Cancelled Bids and Auto Bids cannot be restored through the Bid Table, and cancelling a bid in a Timed Auction is final.
Clerking Controls – Sending the Fair Warning messages
When your Auctioneer starts the classic “Going Once, Going Twice, Third and Final Call” announcement, you need to click the Fair Warning button or press the W key on your keyboard:
Each click or button press will send each respective message in sequence, i.e.
- First click/press = Going Once
- Second click/press = Going Twice
- Third click/press = Third and Final Call
The button will lock itself out after the third click/press, and will re-enable if any additional bids are received or placed:
Does Fair Warning show for all bidders?
Only logged in bidders will see the Fair Warning messages, and of them, only the Underbidders or anyone who hasn’t placed a bid yet will see the Fair Warning messages.
The Current Highest Bidder will still see the confirmation message that they are currently in the lead.
Clerking Controls – Selling a Lot
Once the Auctioneer finishes their Fair Warning countdown, if they call “Sold”, you must click the Sell button, or press the S key on your keyboard, as quickly as possible to prevent late bids.
This will place that Lot into Sold status, but it will remain in the ring until you click Next or press the S key again:
Wait until the Auctioneer has called out the Paddle Number of the winning bidder before proceeding to the next Lot.
I hit Sell by mistake, what do I do?
Click the Undo button or press the U key on your keyboard, this will re-open that Lot for bidding:
Clerking Controls – Passing a Lot (Marking a Lot as Unsold)
Once the Auctioneer finishes their Fair Warning countdown, if they call “On Refer” or state that the Lot hasn’t met its Reserve, click the Pass & Next button or hold Shift and press the P key on your keyboard to mark the Lot as Unsold/Passed and proceed to the next Lot:
We recommend hitting Pause Bidding to prevent any late bids (and to ensure the Lot is referred to the Vendor at the last amount called by the Auctioneer) and waiting to hit Pass & Next until after the Auctioneer has requested to move to the next Lot.
Remember the 3 Cs
When it comes to clerking, there are three key elements to keep in mind to help streamline your workflow and stay focussed:
1. Clerk
Your number 1 priority as the clerk is to, funnily enough, clerk the auction. Your attention and focus has to be on your clerking console, the bids coming through, calls from the Auctioneer (and your other teammates if you’re accepting floor bids and phone bids), and nothing else matters.
Whilst the auction is running, follow these rules:
- Keep a sterile environment
- Keep your phone handy but in your pocket
- If anyone tries to talk to you or distract you, tell them to go away
- Keep hydrated, water is your friend
2. Communicate
You have a symbiotic relationship with the Auctioneer, a Webcast can’t happen without both of you and the two of you need to keep in sync. Remember these three words – call it out.
- Auctioneer not paying attention to their Auctioneer Screen and they’ve missed a bid? Call it out.
- Got an online bid at the same time as a floor bid? Call it out.
- Received a last second bid before the hammer fell? Call it out.
- Got a commission bid that’s off-increment and the Auctioneer hasn’t noticed it? Call it out.
- Not sure what increment amount the Auctioneer wants or is going in? Call it out.
- Not sure if the Auctioneer is calling the current bid or the asking price? Call it out.
The Auctioneer and the Clerk are a team, and to be an effective team make sure the Auctioneer can see and hear you.
3. Cursor
Whilst 95% of the Clerking Console can be operated with your keyboard, actions like accepting a Commission Bid, changing Increment and Asking Price, and launching your Livestream can only be done with a mouse or trackpad.
Clerking can be very fast paced so always keep in mind where your cursor is on your screen. Positioning your cursor is key, keep it close to the actions you need to perform and tune your move speed so you don’t miss the button you need to click.