 Alec Young
 This guide covers how to use our CSV Lotting Template to catalogue and Import your Timed Lots and Listings via our formatted Spreadsheet.
Using our Item Catalogue CSV Spreadsheet
If you’ve decided to use the Spreadsheet Import method for adding your Lots and Listings to the Webtron Dashboard, you can start the Lotting process before even creating your Auction.
As part of our Onboarding and Training program, you will have received a special Guided Timed Auction Lotting Template from Webtron, please open this spreadsheet up in either Microsoft Excel, Google Sheets, or your spreadsheet editing software of choice.

If you can’t find the Onboarding Pack we sent you, click here to download a new copy of the Guided Timed Auction Lotting Template.
The Webtron Dashboard requires certain columns/Item fields to be filled in order to Convert your Items from Ghost to Real Item status, each of the Required columns/fields is marked out with a * in this guide.
Item Type* (Column A)
The first column of the spreadsheet is the Item Type. For Timed Auction Items, there are two Item Types:
- Lot – For Standard Bidding (Bidding on the Increment and Setting Auto Bids) and supports optional Purchase Options – Buy Now or Make Offer.
- Listing – For setting a Buy Now price (Purchase Price) or Make Offer option. No Bidding options.
Fill in either LOT or LISTING in all caps in each row cell.

Lot Number* (Column B)
Under the Lot Number column, you can enter in a Lot/Listing Number for each of your Items. If filling in the Lot Number manually, you can start from any number, and fill in either numeric (numbers) or alphanumeric (letters and numbers) values.
Alternatively, if you leave this column blank, the Webtron Dashboard will be instructed to automatically assign Lot Numbers in ascending order starting from 1 after you click Upload Items inside the Dashboard.

Title* (Column C)
The Title column sets the name of your Item. We recommend structuring your Item Title using keywords and dates where appropriate. If you’re unsure what to enter, a good rule of thumb is structuring the title around “What your Bidders would type out in Google to find your Lot”.
Item Titles can be up to 225 characters long, but we recommend 75 characters or less.

Summary (Column D)
The Summary column is where you can enter in a short 1-2 sentences containing the key information about your Item. The Summary field is best used to provide a brief snapshot either about the item, or useful information like Estimates, Tax status (Inclusive, Exclusive, Exempt etc.) or whatever you feel is appropriate for that Item.
Item Summaries can be up to 300 characters long, but we recommend 120 characters or less. The Summary column/field is also optional and can be left blank.

Description (Column E)
The Description column is where you can enter the full details of your Item. The Description is best suited for longer descriptive content or technical details about your Item. Description is optional and can be left blank.
Whilst the Item Summary displays below the Item Title on your Portal, the Item Description is found exclusively on the Item Details page (accessed by your Bidders through clicking the Item Title itself or the More Details button on the Item).
Descriptions can be up to 3000 characters in length, and can be further formatted after importing your spreadsheet, such as adding:
- Bold
- Italic
Strikethrough- Dot Points
- Number Points
- And basic HTML formatting, like Tables.

Category* (Column F)
The Category is a general category name that you would like to assign to an Item. Assigning a unique Category to an Item or Items will allow bidders to filter your auction by Category. You can either assign the same Category ID Number to all items or enter a unique Category ID Number for each of your Items.
Required Formatting – Refer to your Category Tree and type out or copy paste the Category ID Number inside any cell under the F Column and from Row 3 onwards, then wrap the number in square brackets, like this: [124]
You can then copy and paste that Category ID for each row of Items you create by pressing CTRL C to copy, then CTRL V to paste.
You can also quick-format copy the Category ID by floating your mouse over the bottom-right corner of the cell, when the white plus sign turns black, hold left-click and drag downwards to assign that Category ID to multiple rows.

Vendor* (Column G)
The Vendor column allows you to assign a Vendor profile to each Item. You can either list all items under your default Vendor profile (Your business/trading name), or you can assign different Vendors to different items.
When creating a Vendor profile, a unique Vendor ID Number will be generated, you can retrieve this from the Users & Groups > Vendors menu.
Required Formatting – Refer to the Users & Groups > Vendors menu if you need to retrieve the ID Number for a Vendor profile. Type out or copy paste the Vendor ID Number inside any cell under the G Column from Row 3 onwards, then wrap the number in square brackets, like this: [2]
You can then copy and paste that Vendor ID for each row of Items you create by pressing CTRL C to copy, then CTRL V to paste.
You can also quick-format copy the Vendor ID by floating your mouse over the bottom-right corner of the cell, when the white plus sign turns black, hold left-click and drag downwards to assign that Vendor ID to multiple rows.

Purchase Option*
Purchase Option sets the interactive option available for your Bidders on each Lot and Listing.
Purchase Options for the Lot Item Type:
- None (NONE) – Standard Bidding only, no Buy Now or Make Offer option on that Lot.
- Buy Now (BUY_NOW) – Standard Bidding plus a set Purchase Price, enabling a Bidder to buy that Lot outright.
- Make Offer (MAKE_OFFER) – Standard Bidding plus the option to Offer an Amount for a Lot, up to 3 times per Lot.
Purchase Options for the Listing Item Type:
- Buy Now (BUY_NOW) – Set Purchase Price for that Listing, enabling a Bidder to buy the Listing outright.
- Make Offer (MAKE_OFFER) – Sets the option to Offer an Amount for a Listing, up to 3 times per Listing.
Type out the Purchase Option you’d like to set, following these formats:
- For None, type out NONE in all caps
- For Buy Now, type out BUY_NOW in all caps, add the underscore by holding the SHIFT key and pressing the Dash “-” key on the top-right of your Keyboard (next to the Plus “+” sign).
- For Make Offer, type out MAKE_OFFER in all caps, add the underscore by holding the SHIFT key and pressing the Dash “-” key on the top-right of your Keyboard (next to the Plus “+” sign).

Purchase Price (Column S)
The Purchase Price column allows you to set a Purchase Price amount for Items using the Buy Now Purchase Option, or set a hidden Minimum Acceptable Amount for Items using the Make Offer Purchase Option.
Required Formatting – Whole Numbers only, Timed Auction Lots and Listings do not currently support decimal values. Do not type in currency symbols, brackets or decimal points, just the whole number, like this: 500
Opening Bid (Column T)
The Opening Bid column allows you to set an Opening/Starting amount for each item (i.e. the amount/value of the first bid for each Item). Setting an Opening Bid is optional, either type in the amount you’d like to set for the Opening Bid, or leave this column empty to start your item at 0 + the set Increment.
Required Formatting – Whole Numbers only, Timed Auction Lots do not currently support decimal values. Do not type in currency symbols, brackets or decimal points, just the whole number, like this: 500

Bid Increment* (Column U)
The Bid Increment column is where you can set the Increment amount or “rises” that you would like each bid to ascend in for each Item.
Required Formatting – Whole Numbers only, Timed Auction Lots do not currently support decimal values. Do not type in currency symbols, brackets or decimal points, just the whole number, like this: 25
Alternatively, Webtron can setup up an Auto Increment table with you, this will allow you to leave the Bid Increment column blank and, upon clicking Upload Items, the Webtron Dashboard will be instructed to assign an Increment based on the Opening Bid for each Item. (i.e. you may like $10 increments for amounts between $0 – $50, $20 increments for amounts between $51 – $100, and $50 increments for amounts $101 and over).
If you are already using Auto Increments, leave the Bid Increment column blank.

Reserve Price (Column U)
The Reserve Price column where you can enter in any Reserve Prices applicable to your Timed Lots. If there is no reserve applicable to your Timed Lots, either enter 0 or leave the cell blank.
Required Formatting – Whole Numbers only, Timed Auction Lots do not currently support decimal values. Do not type in currency symbols, brackets or decimal points, just the whole number, like this: 25

Contact Seller
Typing Y under the Contact Seller column will add the “Ask A Question” button to an Item. This will enable your Bidders to send through messages via an email inquiry to your Dashboard Admins on the Contact Seller notification list. Contact Seller is disabled by default, so you can leave this column blank or type N to manually disable Contact Seller.

Save your Spreadsheet as a CSV
Once you’ve filled in all of your Item data, you’ll need to save your Timed Auction Lotting Spreadsheet as a CSV.
Sorry but the file could not be imported. Please correct these errors before uploading the file once again.
Line 1 has 1 error: This file does not have the expected number of columns – 33 were expected but 2 was found.
Open your spreadsheet editor of choice again and ensure you have saved or exported your spreadsheet as a CSV.
Importing your Item Catalogue CSV Spreadsheet
Once you’ve created a new Timed Auction and finished filling in our formatted spreadsheet, you can import your Items to your Auction via the Create New Items menu.
Step 1: Log into the Webtron Dashboard and open the Auctions & Items > Create New Items menu
After you’ve logged into the Webtron Dashboard, click on the Auctions & Items dropdown, then click on Create New Items (the last option in the dropdown):
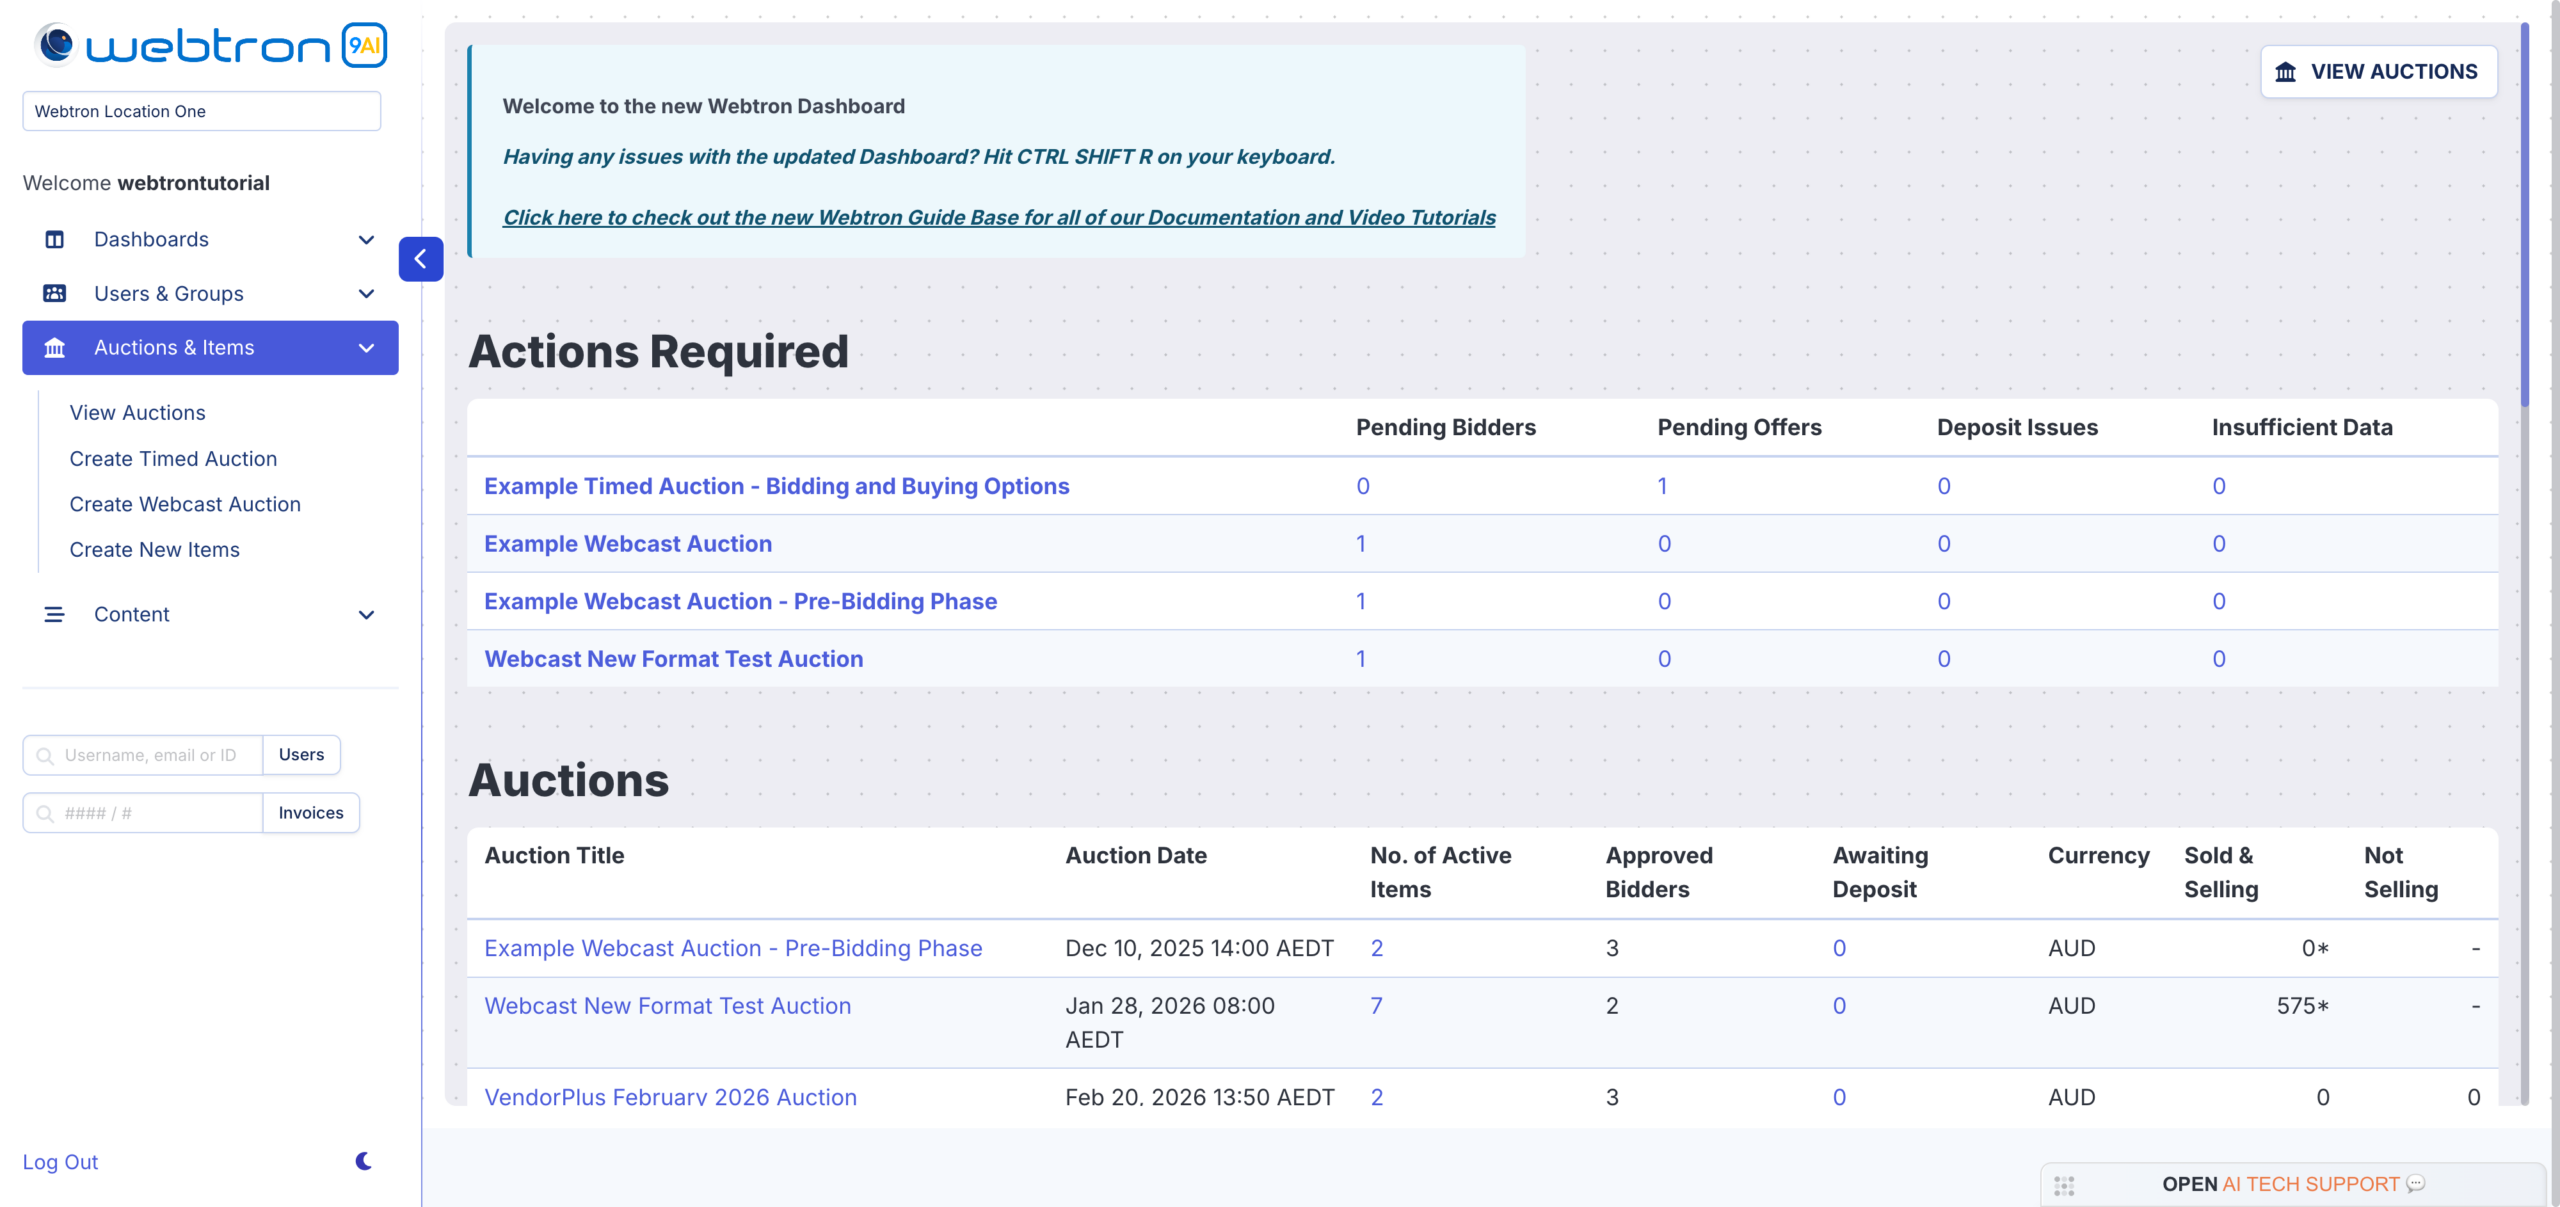 Click here to open the Auctions & Items dropdownClick here to open the Create New Items menu
- Click here to open the Auctions & Items dropdown
- Click here to open the Create New Items menu
Step 2: Select an Auction and click Choose File
You’ll now see another dropdown labelled Select an Auction, click on the Select an Auction dropdown, you’ll see a list of Auction Titles, click on the Auction Title for the Auction you’d like to upload these Items to.
After selecting an Auction two options will appear; Start Creating Items and Upload Items, click on the Choose File button next to the Upload Items button, and select your CSV Spreadsheet via your File Explorer/Finder.
Once you’ve selected your CSV Spreadsheet, the Upload Items button will turn green, click on it to begin importing your Items:
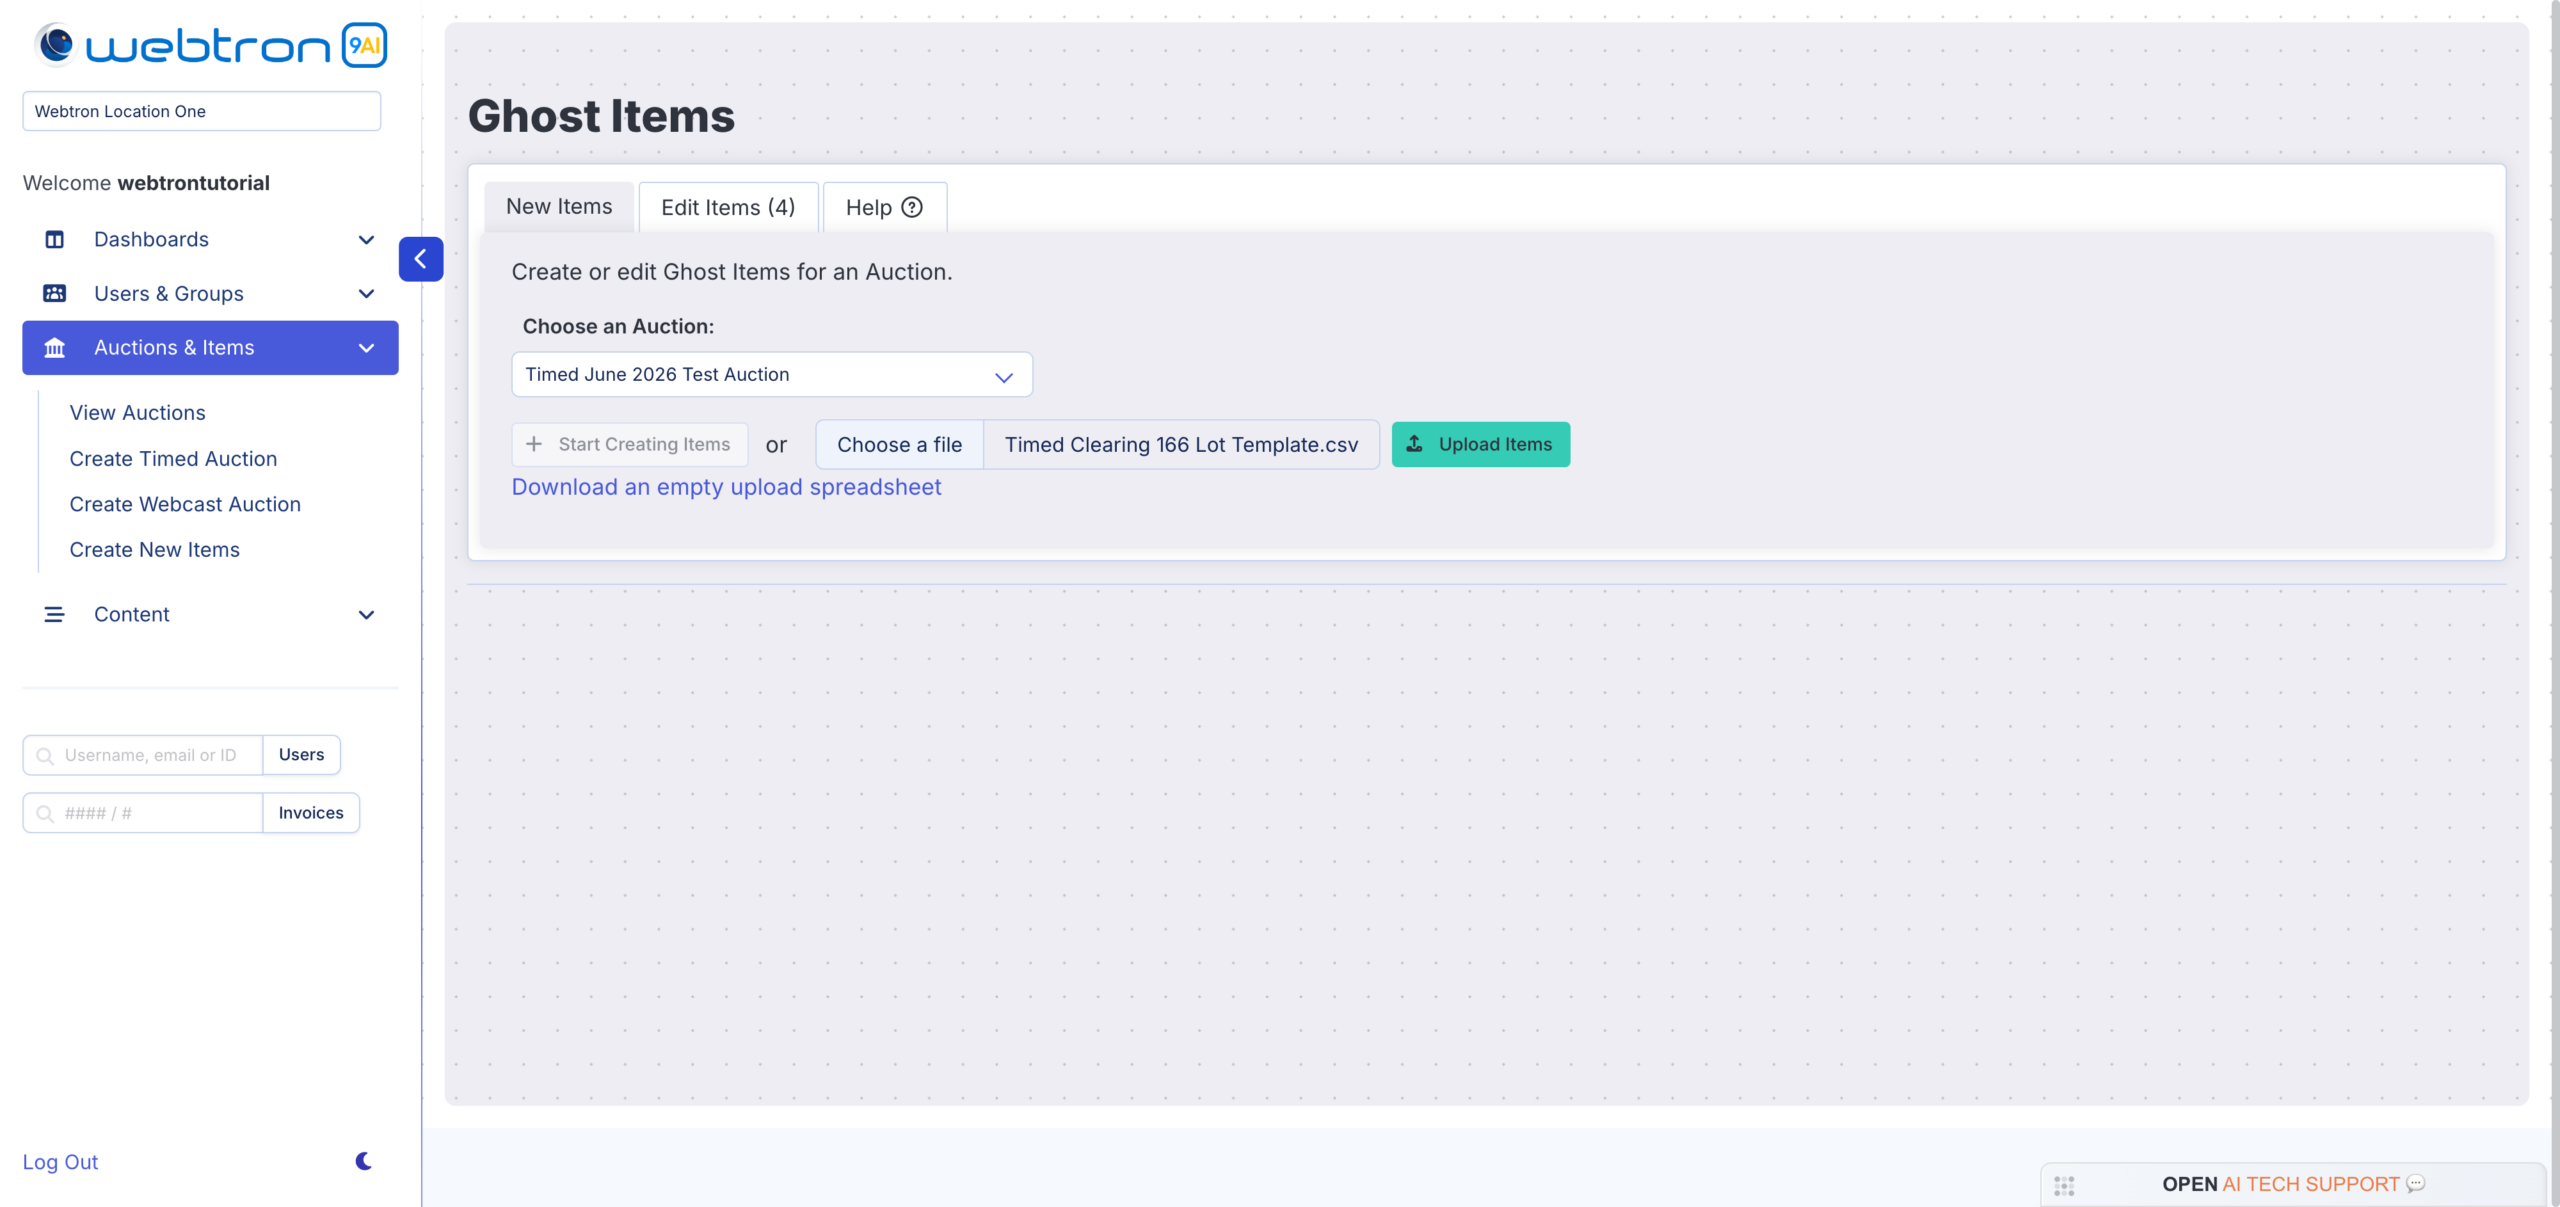 Click on and choose your Auction from this listYour Auction must be in either Preview or Live status to appear in the list.Click Choose a fileClick Upload ItemsOnce you’ve picked your CSV from your File Explorer/Finder, this button will enable.
- Click on and choose your Auction from this listYour Auction must be in either Preview or Live status to appear in the list.
- Click Choose a file
- Click Upload ItemsOnce you’ve picked your CSV from your File Explorer/Finder, this button will enable.
Step 3: Review your Imported Items
You’ll be moved into the Create Ghost Items menu and the Dashboard will display a list of your Imported Items inside the Ghost Items table.
The Ghost Items table is made up of rows, with each row representing an individual Item. If there are any fields containing errors, the row will be prepended with a red triangle pointing to the right –
The fields within the row triggering this error will be marked with a friendly red Warning badge, float you cursor over the badge for more information on what you need to fill in or fix for that field:
 Error indicatorThis right-pointing triangle flags that this row contains errors.Error indicatorThe warning icon within the field flags this field as containing incorrect or missing content.
- Error indicatorThis right-pointing triangle flags that this row contains errors.
- Error indicatorThe warning icon within the field flags this field as containing incorrect or missing content.
Navigation Recommendations
To move from one end to the other, you can click and drag the horizontal scroll bar at the bottom of the Ghost Items table, or click the button above the top-right of the table to instantly switch from one end of the table to the other:
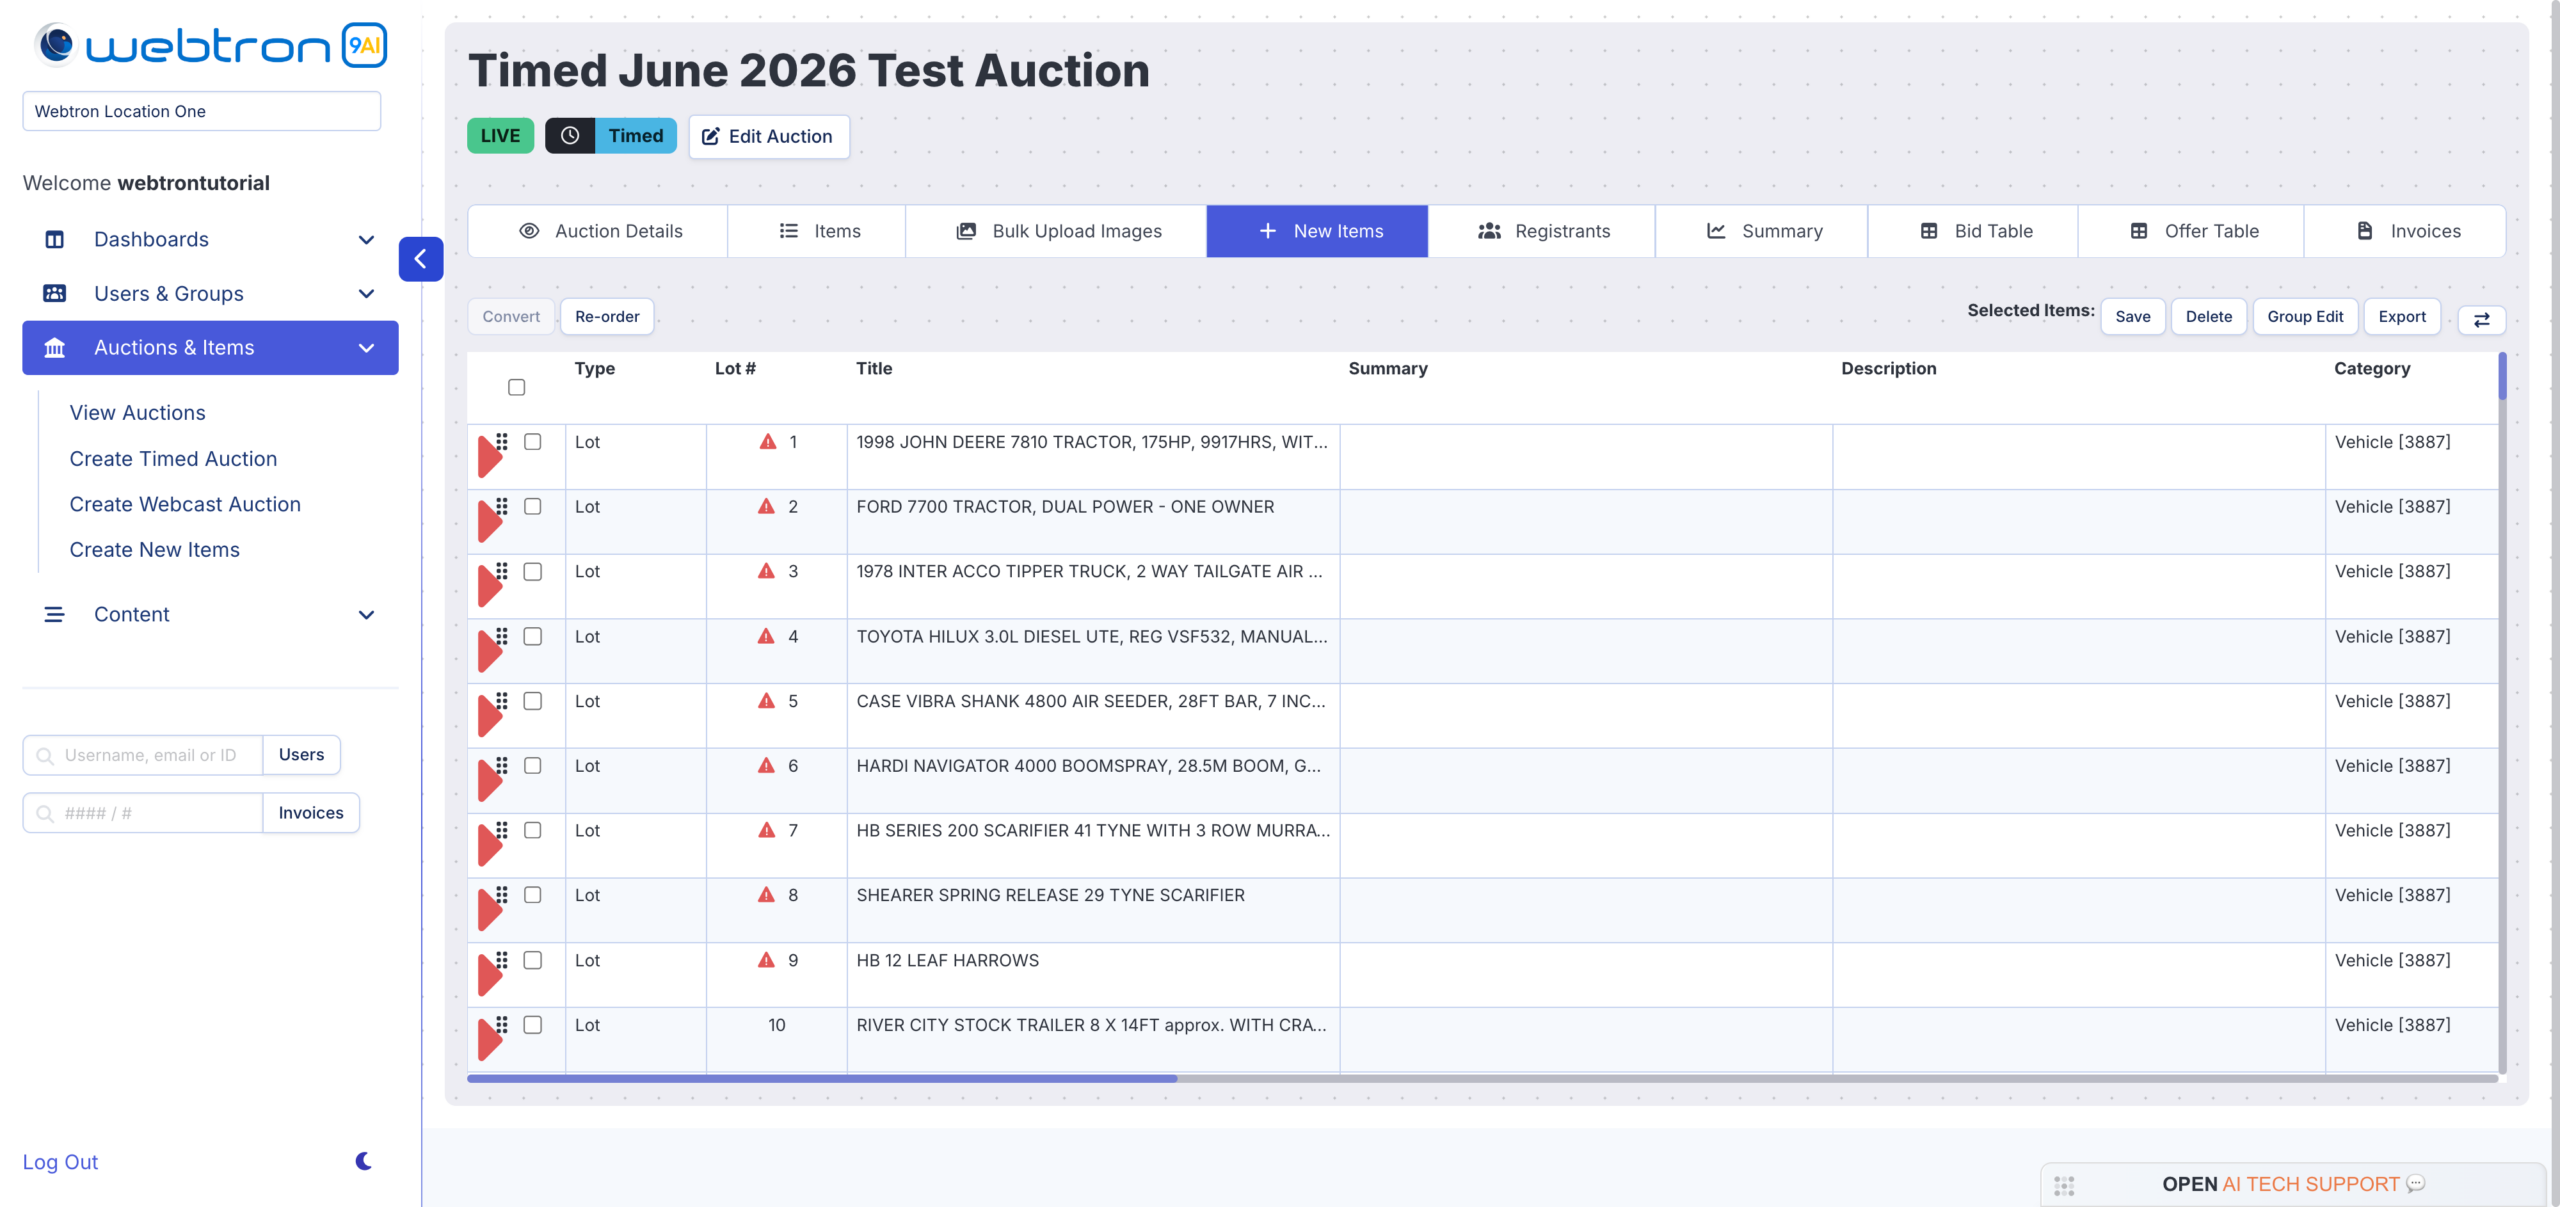 Click and drag this bar left and right to traverse the Ghost Items tableor Click the Left-Right arrow button here to switch to the other end of the Ghost Items table
- Click and drag this bar left and right to traverse the Ghost Items table
- or Click the Left-Right arrow button here to switch to the other end of the Ghost Items table
Group Edit Recommendation
If you need to make uniform changes or corrections to multiple Items, you can tick your ghost items using the checkboxes at the left-hand edge of the table, then click the Group Edit button above the top-right of the table:
 Tick this checkbox at the top-left to select all Ghost Itemsor tick each of these checkboxes to select individual Ghost ItemsClick Group Edit to open the panel
- Tick this checkbox at the top-left to select all Ghost Items
- or tick each of these checkboxes to select individual Ghost Items
- Click Group Edit to open the panel
The Group Edit panel allows you to make changes from Category to Location, simply tick any of the options, set the value and then click Save at the bottom of the Group Edit panel:
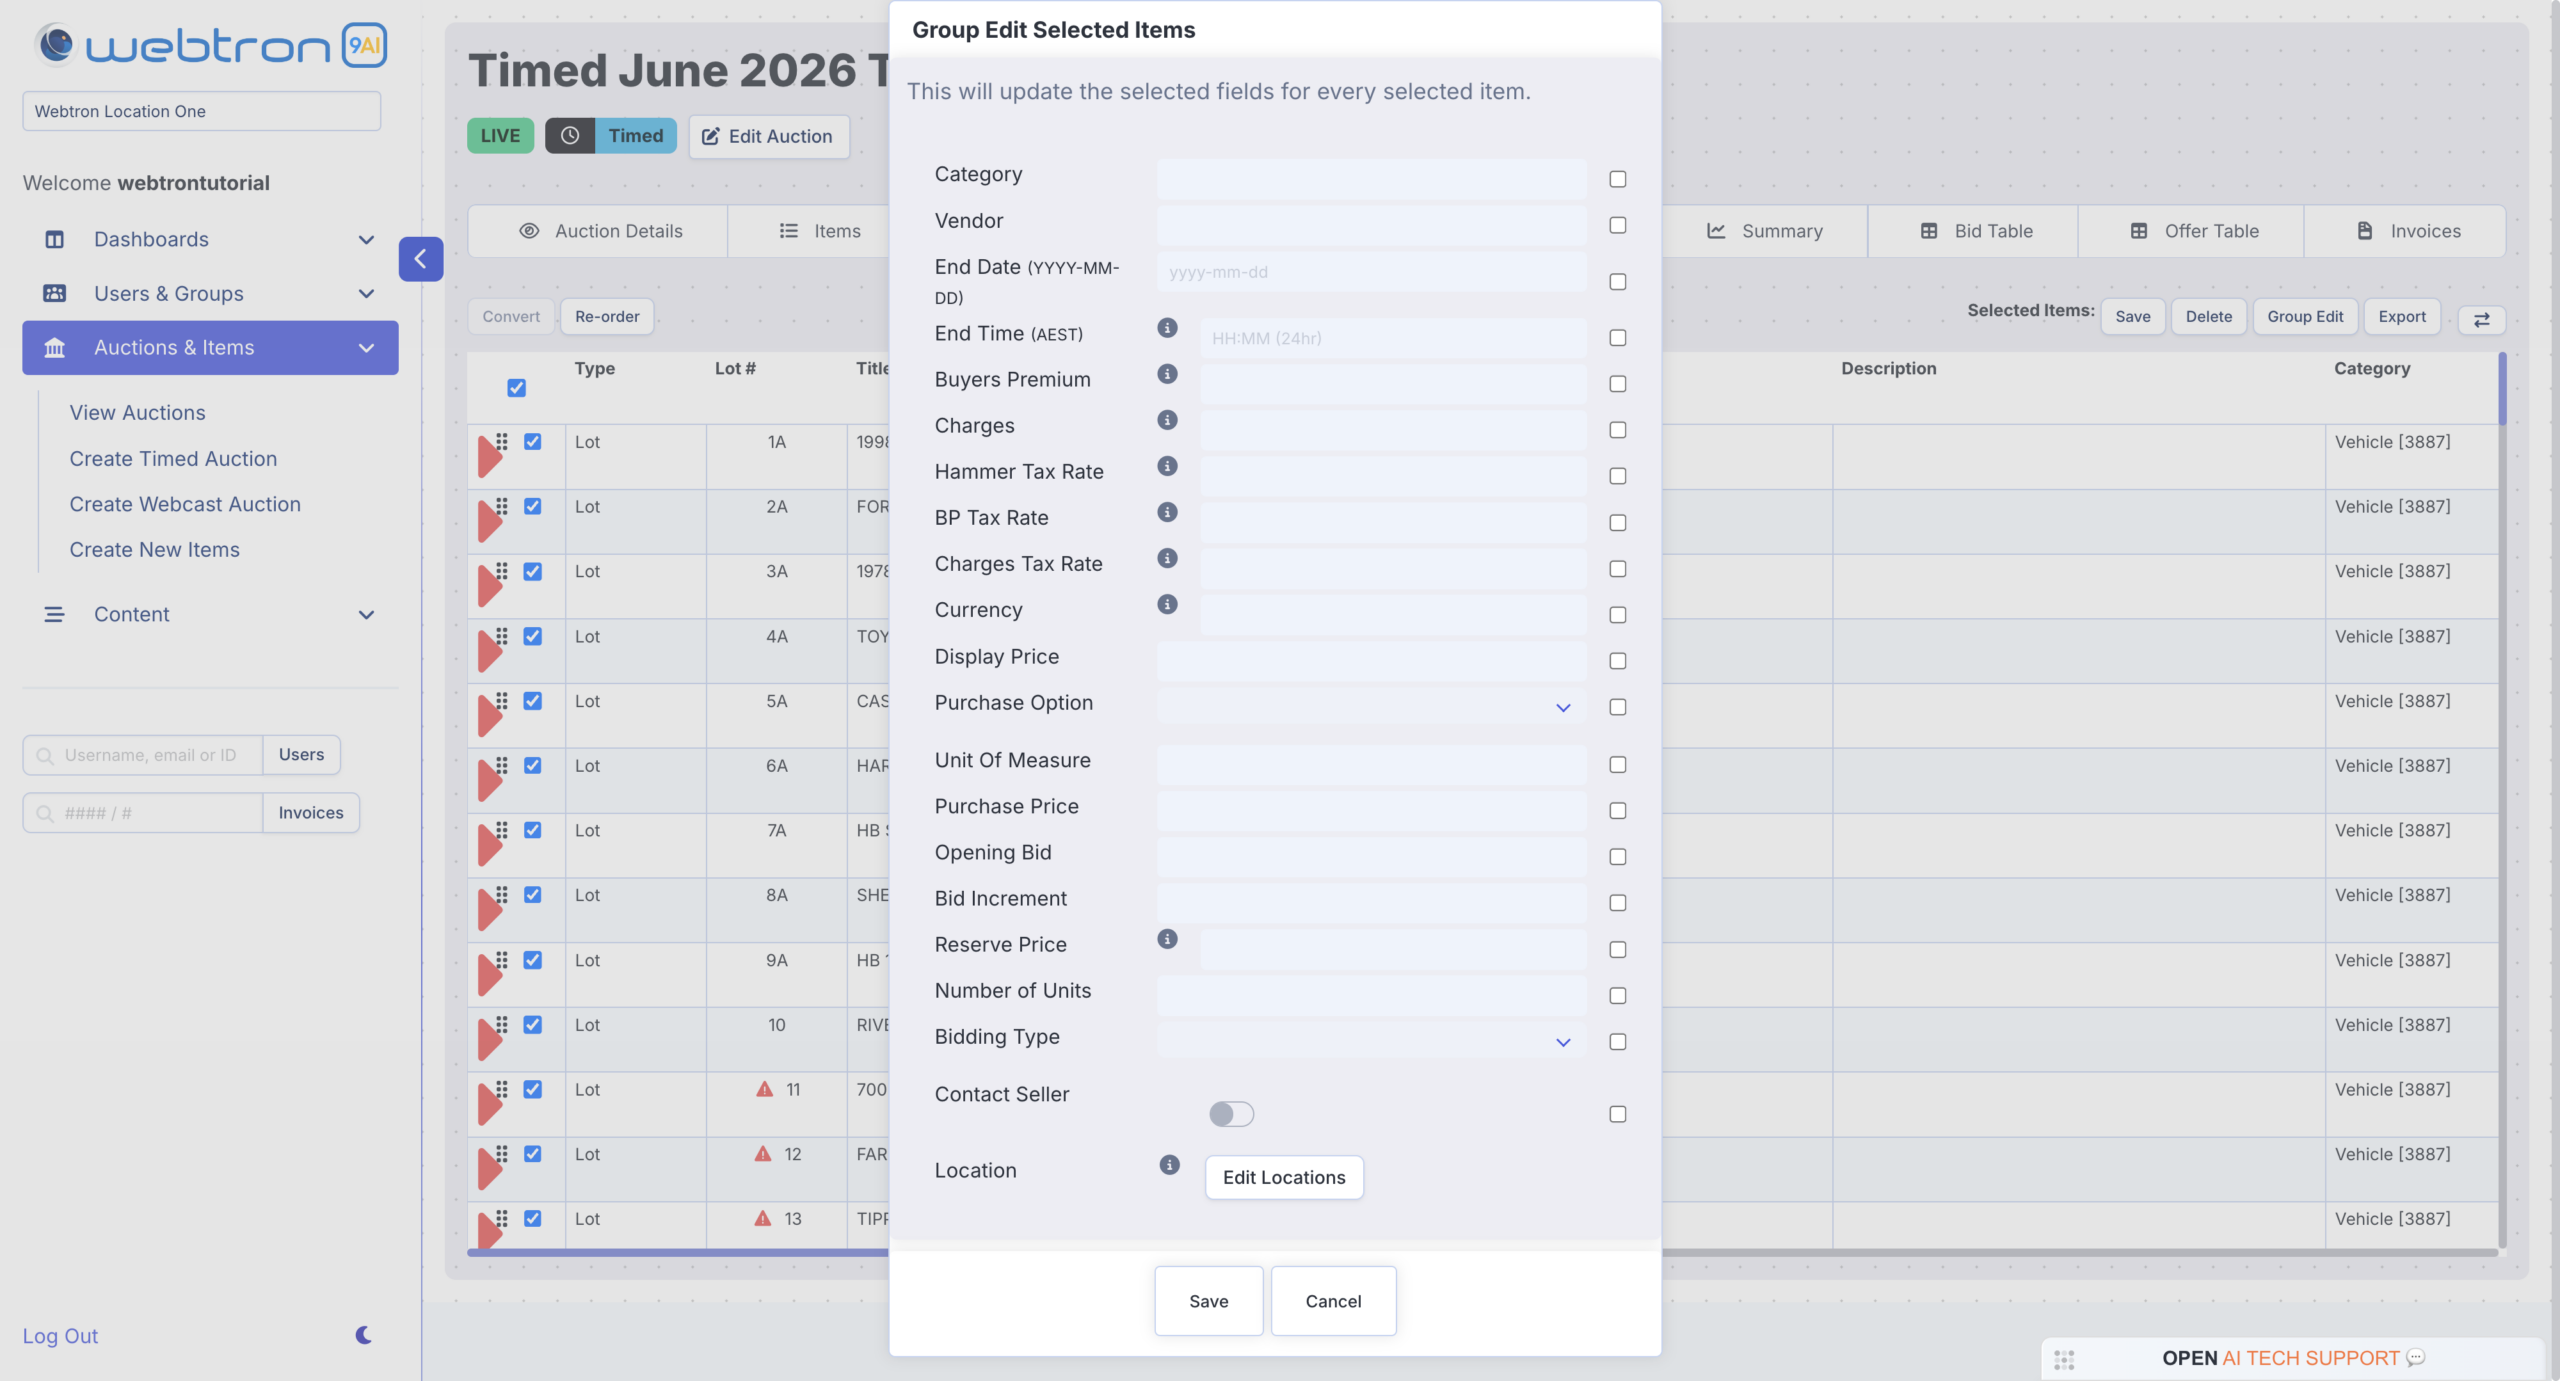 Tick this checkbox to enable the fieldFill in or select your changesClick save to apply your changes across all selected Ghost Items
- Tick this checkbox to enable the field
- Fill in or select your changes
- Click save to apply your changes across all selected Ghost Items
Step 4: Convert your Items from Ghost status to Preview status
Once all of your Items have been reviewed and any flagged fields have been fixed, you can select your Items using the Select All checkbox at the top-left of the Ghost Items table, then click Convert. You’ll now see a confirmation panel, click Confirm to proceed:
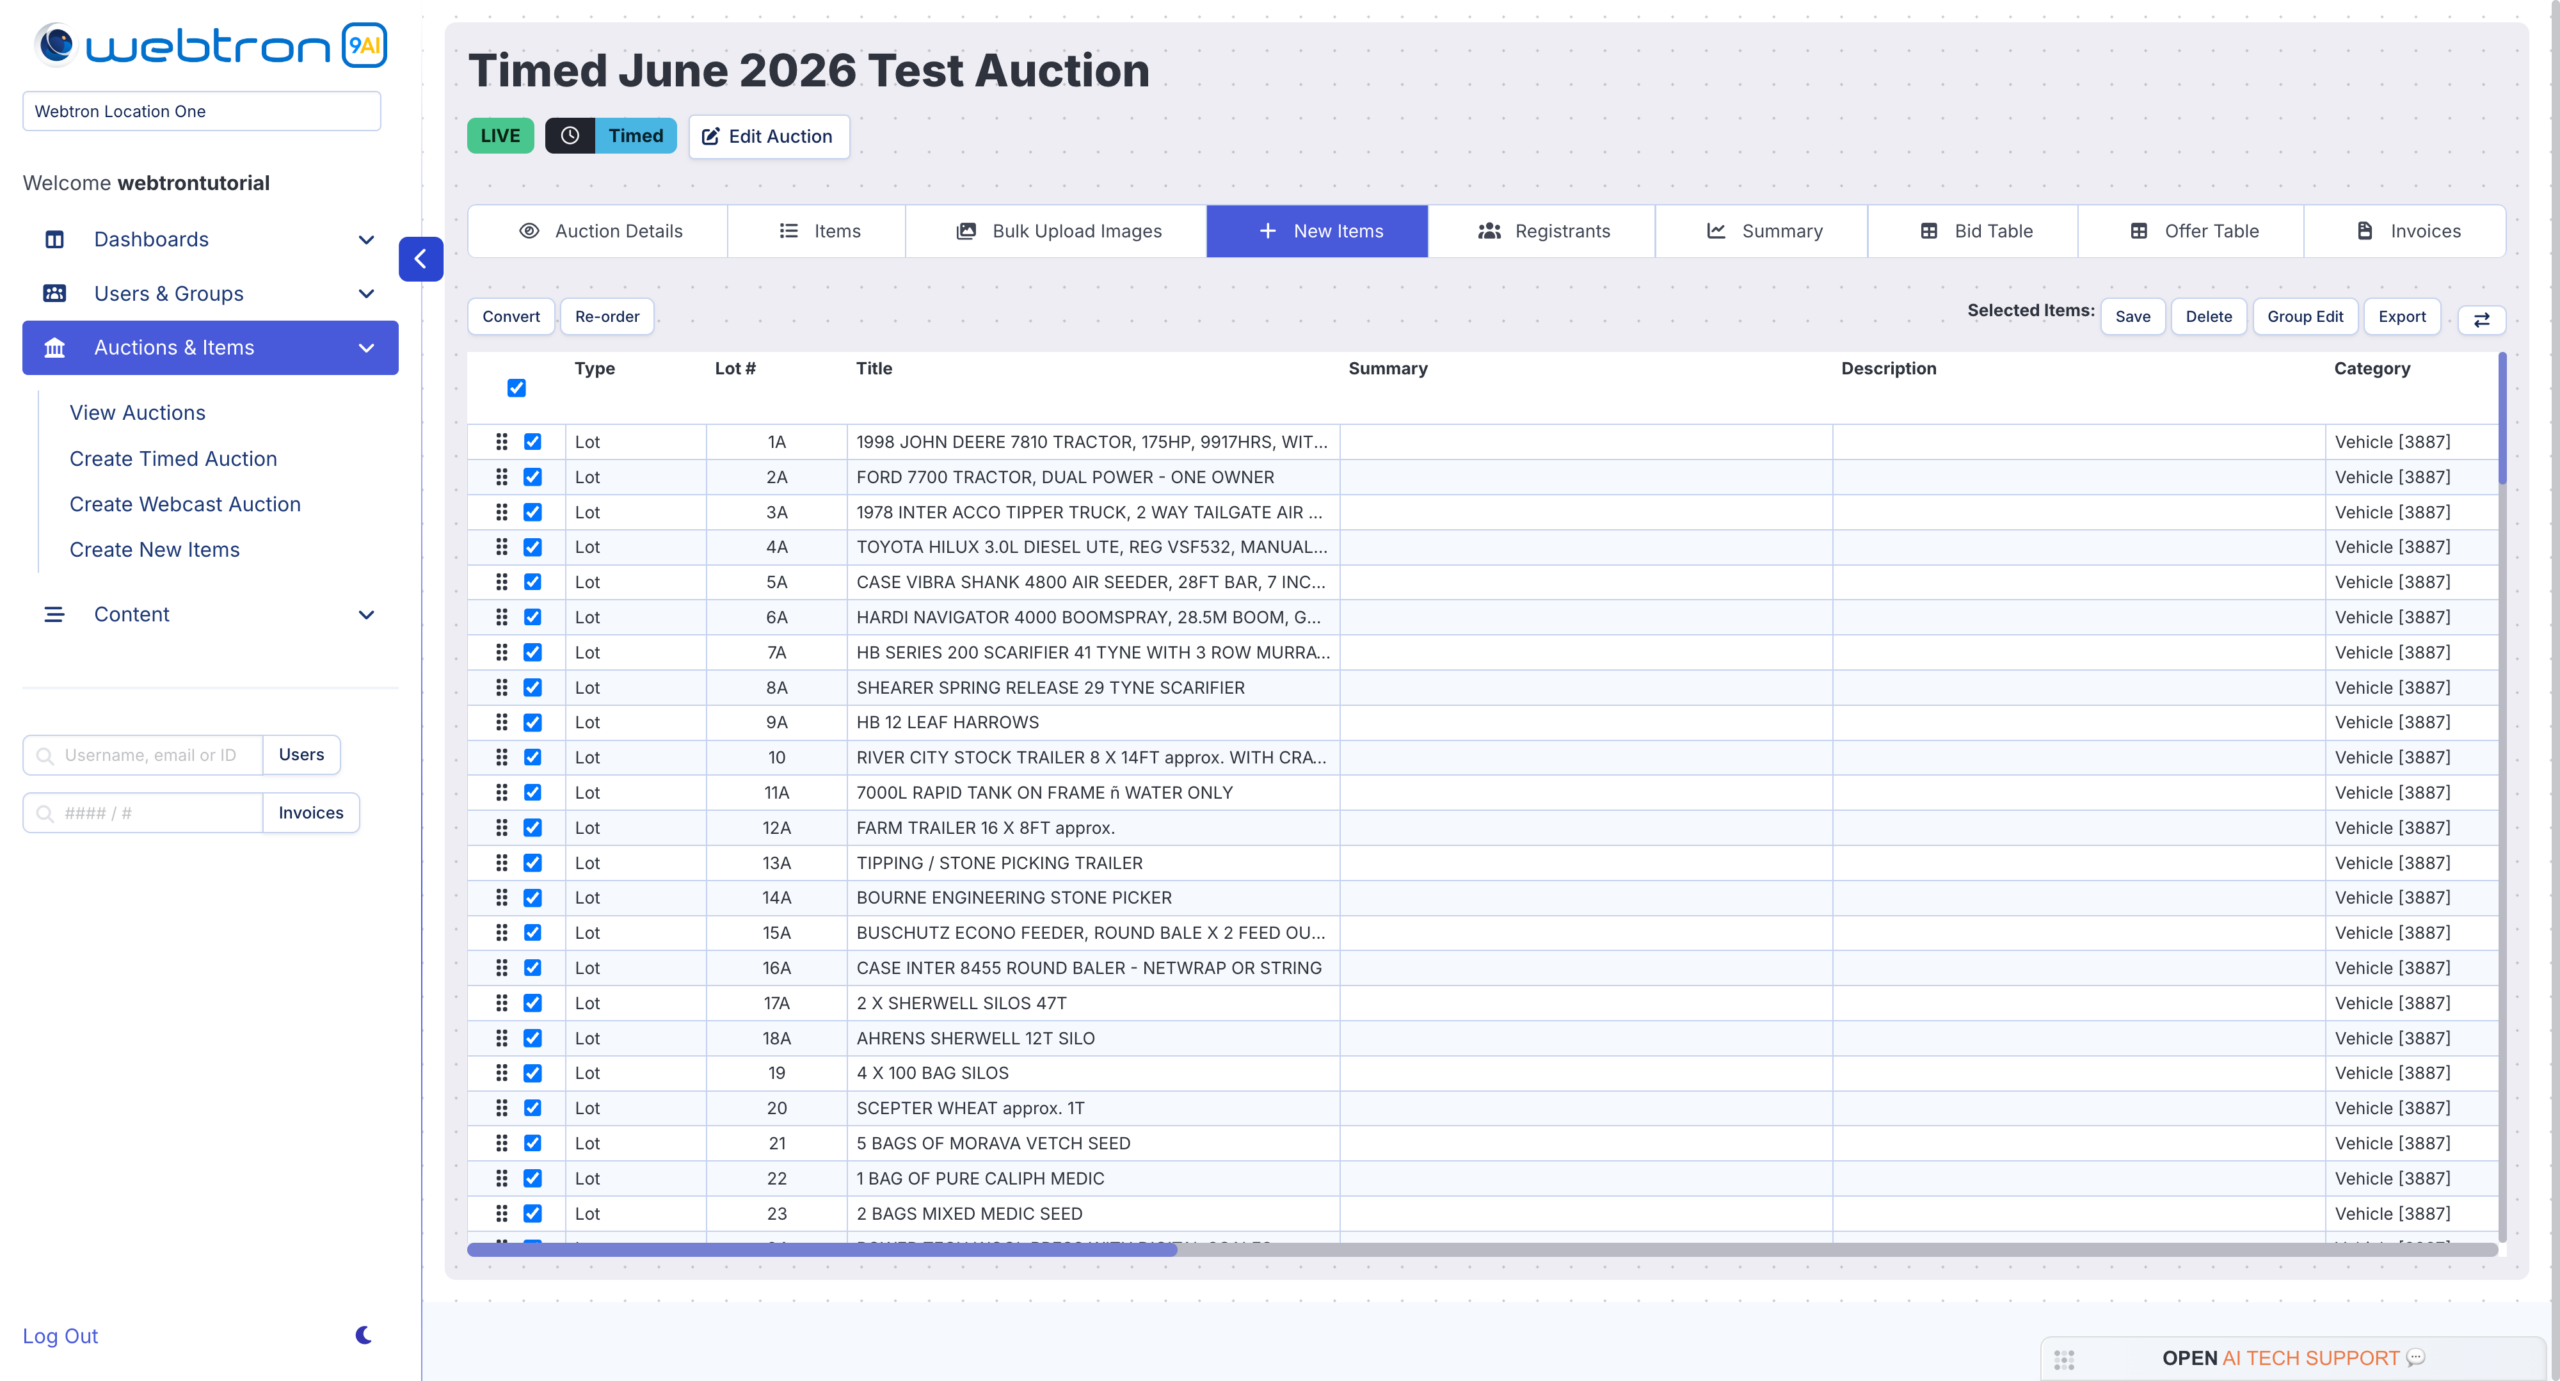 Select All or select individual Ghost ItemsClick Convert to proceed
- Select All or select individual Ghost Items
- Click Convert to proceed
Step 5: Open the Items List
The Create Ghost Items menu will now empty out and your Items will be transferred over the Item List for this Auction. Click on Items shortcut at the top-right of the Create Ghost Items menu to open the Item List and access your converted Items:
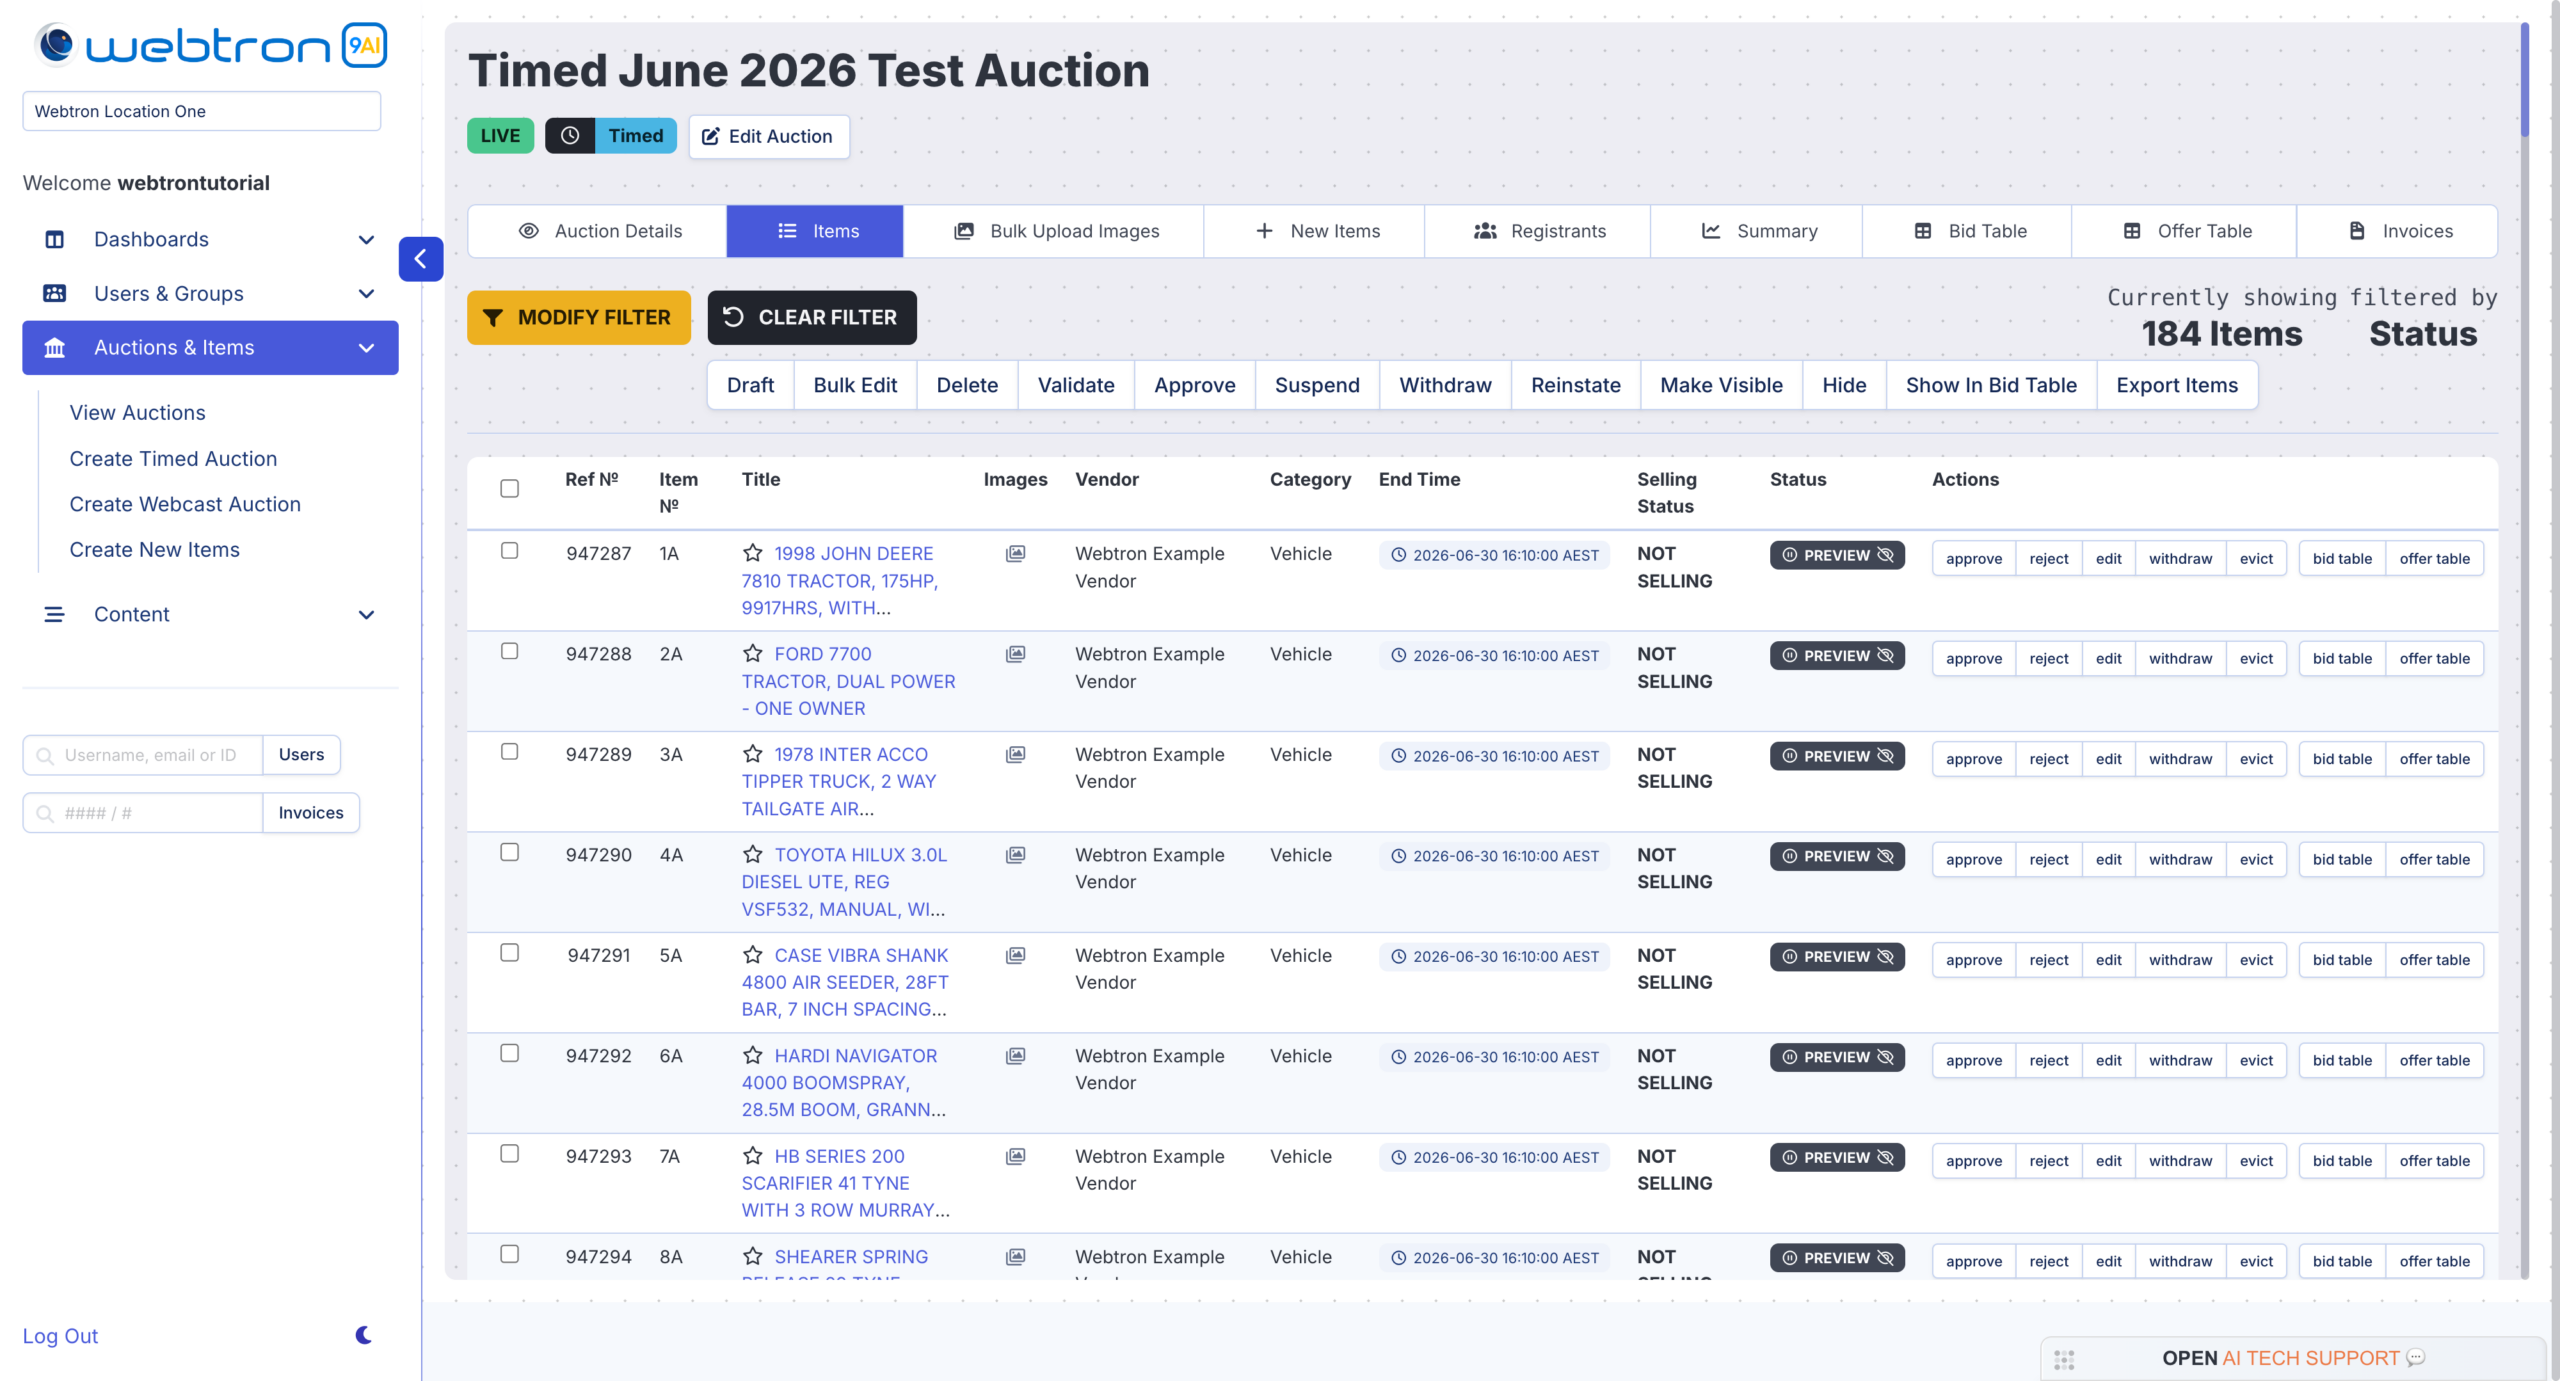 Click here to open the Items ListItem StatusYour newly-converted Items will land in Preview status and remain hidden from your PortalBulk EditWhen in Draft or Preview status, you can make further changes to your Items by selecting them and pulling them into Bulk Edit
- Click here to open the Items List
- Item StatusYour newly-converted Items will land in Preview status and remain hidden from your Portal
- Bulk EditWhen in Draft or Preview status, you can make further changes to your Items by selecting them and pulling them into Bulk Edit
What’s next?
Now that your Items have been imported and converted, you can start uploading photos to them, either via the Bulk Upload Images menu, Bulk Edit’s Attachments Uploader or VendorPlus.
FAQ – Importing Timed Lots and Listings via Spreadsheet
Q: When I click Upload Items it’s giving me a “Number of columns” error, what do I do?
A: The Dashboard will give you the “Number of columns” error if your spreadsheet is:
1. The wrong format – It must be a .csv (CSV UTF-8 Comma Delimited), or
2. The Spreadsheet Template’s columns have been edited or are missing – the Dashboard will search through your spreadsheet and match your Item data to each respective column, do not alter the template and make sure you have used the template to catalogue your Items.
Q: Can I convert my Lots and fix any errors or missing info later?
A: No, all required fields must be filled in or fields fixed before the Convert button will enable for that Lot. Set placeholders and use Bulk Edit later if necessary.
Q: I left out a Lot from my upload spreadsheet, can I just enter it in manually to the Dashboard?
A: Yes, in the Create Ghost Items menu, click on the faint blue line (the bottom row of the table) to create a new Item, like this:
Q: I made a mistake or left out something in the spreadsheet, can I apply a change to multiple Items rather than doing it one-by-one?
A: Possibly, if you need to apply a change to multiple Items and it’s from the Category column onwards, you can use the Group Edit panel. Simply select your Items using the checkboxes at the left-hand edge of the Ghost Items table, then click the grey Group Edit button at the top-right of the Create Ghost Items menu: